The Battle of Seacroft Moor 1643 Back to the Main Historical Society page
Back to the Barwicker Contents page

The Battle of Seacroft Moor 1643


from The Barwicker No. 85


The only recorded outbreak of hostilities in the Civil War within the parish took place at what is commonly referred to as Seacroft Moor on 16th March 1643. There is no such place as Seacroft Moor and the name has arisen as it was the name given by Sir Thomas Fairfax to the battle which he reported to Parliament soon after the battle. This article outlines the events leading up to the battle, the consequence of its outcome and describes the contribution made by the inhabitants of Kiddal and possibly Potterton to its outcome. The account of the battle given by Sir Thomas Fairfax is the only one by a participant which we can find. There must be some bias in his report the detail of which unfortunately we cannot cross-check because of the absence of contemporary Royalist reports. His account does speak plainly of the success of his enemy on this occasion.

In early 1643, the position of both the Royalist and the Parliamentary sides in Yorkshire was fluid and neither side had the ascendancy. Parliament held Leeds, Bradford, Halifax and the other woollen towns of the West Riding, Hull under Sir John Hotham, Scarborough was under Sir Hugh Cholmley. The main force was under Lord Fairfax, with his son Sir Thomas Fairfax, in Selby holding contact between Hull and the West Riding. The remainder of the county was mostly in control or open to the Royalist army. The Royalists had assembled an army of at least 10,000 men under William Cavendish, Earl of Newcastle. In February, Queen Henrietta landed at Bridlington bringing funding and armaments from the Lowlands for the Royalist cause and then went to the safety of York.

Cholmley defected to the Royalist cause and the Fairfaxes began to suspect that Sir John Hotham was of a similar mind. This left the Fairfaxes in a weak position in Selby. The Earl of Newcastle placed his army of about 10,000 men at Clifford Moor where it was well placed to control the river crossings at Wetherby and Tadcaster and to strike the Fairfaxes at Selby or their communication lines to Leeds. Lord Fairfax decided that Selby would have to be abandoned and the Parliamentary army should withdraw to Leeds.

In order to draw the attention of Newcastle’s close attention away from the Selby to Leeds route, Lord Fairfax sent his son with three Troops of cavalry (about 180-200 men) and a body of infantrymen (possibly 1,000 men) towards Tadcaster via Sherburn. While this was happening he took the remaining 1,500 men and the ordnance and ammunition on the slow journey to Leeds. The object in sending Sir Thomas Fairfax with this body of men to Tadcaster was to mislead the Royalists. It worked for Newcastle concluded that Fairfax’s objective was to attack York.

Tadcaster was defended by 3-400 Royalist men, who quickly fled towards York. Fairfax stayed for 3-4 hours destroying its defences. Newcastle sent General Lord Goring with 20 troops of horse (some seven times the cavalry strength of Fairfax’s) across the Wharfe and then to Tadcaster. Heavily outnumbered, Fairfax ordered his foot soldiers to set off towards Leeds across Bramham Moor while he stayed with his horse in order to hold up Goring’s advance. He used the lanes leaving Tadcaster to the west to good effect . However, on reaching Bramham Moor, he found that the foot soldiers were waiting on the edge of the moor (probably around Headley Bar east of the present A1) for orders to continue. He split the foot soldiers into two divisions and protected them at the rear with his cavalry. The Royalist cavalry split into three groups and followed at about two musket shot range away from the Parliamentarian troops. Fairfax’s men crossed Bramham Moor safely and reached some enclosed fields (almost certainly Kiddal and possibly Potterton). Enclosed fields provided protection from cavalry in much the same way as the fields of Normandy impeded the progress of tanks after D-Day in the Second World War. The security which the fields afforded the Parliamentary army gave them false confidence.

Fairfax’s description of the next stage of the journey is confusing to anyone who doesn’t know the area well. He wrote :

“But having again gotten to some little enclosures, beyond which was another Moor, called Sea Croft Moor (much less than the first) here our thinking themselves more secure, were more carelesse in keeping order, and while their officers were getting them out of Houses where they sought for drinke, (being an exceeding hot day), the Enemy got, another way, as soone as we, upon the Moor.”


Many commentators have misread this passage and concluded that the enclosures were in Seacroft. However, the account says that the enclosures were reached before reaching the moor. It was a warm day. The men had marched from the Selby/Sherburn area to Tadcaster, attacked its defences, demolished them and then marched from Tadcaster to Potterton. According to Fairfax, his troops were ‘countrymen’; this implied that they were not hardened professional soldiers. They were thirsty and tired. They sought drink in the houses and lacked discipline and were unaware of the dangerous position that they were in. The officers had difficulty getting them out of the houses.


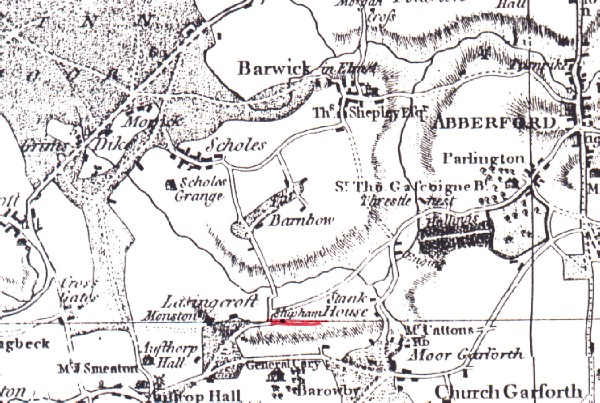
They progressed in some disorder to the next moor which Fairfax called Seacroft Moor. This we know as Whinmoor. There is no contemporary map of the area to show us what it was like in the mid-17th century. However, Jeffrey’s map of some 130 years later clearly shows Bramham Moor and to its west, Whinmoor which stretches from the western edge of Saw Wood to the very edge of Seacroft. Saw Wood existed at that time. It is recorded in 1532-34 Barwick tenants had complained that the agents of the lord of Thorner manor were interfering with their rights in Saw Wood (see “The making of a Yorkshire village Thorner. Terence W Brown page 50). The wood and slightly higher ground half a mile north of Kiddal would have enabled cavalry to bypass the marching column without being undetected

Had Fairfax seen what was likely to happen perhaps he would have moved south to the protection of the steeper slopes and enclosed fields of Barwick and Scholes. With even greater foresight he would have been safer to have used the cover of the Cock Beck west from Aberford rather than expose his force to two moors which made them vulnerable to attack. Perhaps he considered a more southerly route would have drawn the Royalists too close to his father’s column.

When Fairfax’s men reached the Whinmoor, they were surprised to see Royalist cavalry approaching them from the north. With a better knowledge of the area, we know that some of the Royalist cavalry could have appeared to Fairfax to have returned to the main army on Clifford Moor but have travelled along the Bramham to Thorner Road out of sight and entered Whinmoor sheltered from sight by Saw Wood. I would contend that the Battle of Seacroft Moor was more likely to have taken place on Whinmoor between the Cock Beck, Morwick Hall and Saw Wood, just to the north and west of Scholes. In the words of Fairfax the battle was as follows:

“…the enemy got, another way, as soone as we, upon the Moor. But when we had almost passed this plaine also, they seeing us in some disorder, charged us both in Flanke and Reer. The Countrymen presently cast downe their Armes and fled; and the Foot soone after, which, for want of pikes were not able stand their horse. Some were slaine, and many taken prisoners. Few of our Horse stood the Charge. Some Officers, with me made our Retreat, with much difficulty, in which Sir Henry Foulis had a sleight hurt. My Cornet was taken prisoner, yet got to Leeds about 2 hours after my father and the Forces with him were arrived thither safe. This was one of the Greatest losses we ever received ….”


Had the army reached the Cock Beck, they would have been almost into the enclosed fields of Seacroft and in a safer position.

It has been estimated that Fairfax lost 200 men killed and about a thousand taken prisoner. In his memoirs written later, he says:

“…we were so busied about releasing the prisoners that wee taken at Seacroft most of them being countrymen, whose wives and children were still importunate for their release, which was as earnestly endeavoured by us, but no conditions were accepted: so as their continual cries, tears, and importunities, compelled us to think of some way to redeem these men; and we thought of attempting Wakefield.”


It was for this reason that Fairfax executed a bold and successful attack upon Wakefield in May 1643. With 1100 men he attacked Wakefield which was garrisoned by about 3000 men. He was able to release his men captured at Seacroft and, in addition, captured General Goring and 1400 others.

Unfortunately we have no account surviving locally of the accidental contribution to one of Sir Thomas Fairfax’s greatest defeat by the inhabitants of Kiddal and Potterton. It should have been an event which would pass down to the succeeding generations but instead we have to rely upon an official dispatch to Parliament for this account. The parish records were not maintained at that time. There is no indication where the dead from the battle were buried.

Harold Smith


Back to the top
Back to the Main Historical Society page
Back to the Barwicker Contents page